Spring publishing is a sophisticated variant or job from the Spring framework. It is made up of third-party libraries and Embedded HTTP servers, in addition to the Spring framework. It produces high-quality, more time-consuming, and standalone apps that depend on the Spring framework.
Spring Hack is working to eliminate the use of XML-based and annotation-based settings in software by default.

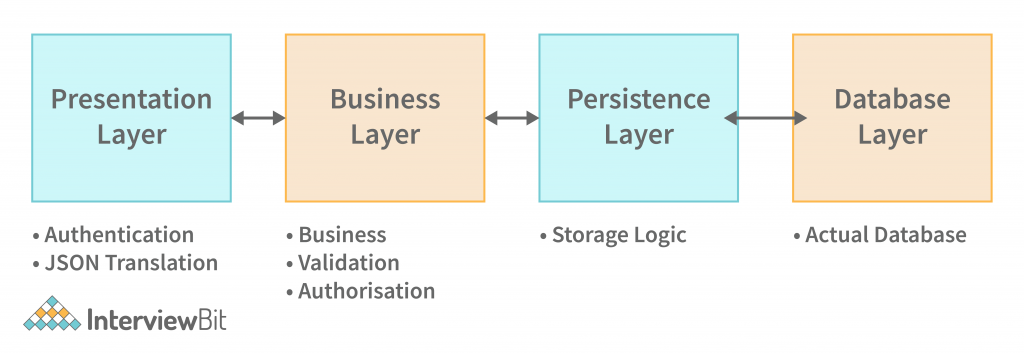
We will learn how this Spring Boot framework was designed in this tutorial. The above diagram illustrates that every layer of this structure is connected to the layer immediately above or below it because of the workflow. Every layer, therefore, only requires access to its proximate neighbours, so if we alter the API of a single layer, for example, we only need to upgrade the layers alongside it.
What is Spring Boot
Spring Boot is an automated version of the traditional spring framework, simplifying and automating the process. Spring Boot is built on top of the Spring framework and is a layered structure in which every layer communicates with each other layer(from top to bottom in hierarchical order). The Spring Boot framework documentation provides the following definition.
Spring Boot makes it possible to create high-quality, production-grade Spring applications that are simple to deploy and run.
Spring boot is designed to remove XML and annotations-based configuration settings from the application. Spring boot provides the following advantages, including opinionated(options to later change the configuration), convention over configuration, stand-alone, and production-ready: It provides stand-alone, production-ready, and convention over configuration options.
Features of Spring Boot
Spring Boot is a Java framework. It is built on the Spring framework and takes an apertures, opinionated, boilerplate-free approach to Spring applications. Spring Boot, however, does not require you to write excessive boilerplate code. The majority of Spring Boot applications, however, require minimal Spring configuration.
A Java developer who uses the auto-configuration feature can automatically configure his or her Spring application using jar dependencies, thereby making it very convenient for them to develop applications.
Spring Boot features that Java developers should be aware of are listed below:
Spring Initializr
Spring Boot projects are created through cURL, multiple IDEs, and the Spring CLI using Spring Initializr. Spring Boot is a Spring feature that enables project creation using cURL. Spring CLI, Spring IDEs, and the Spring CLI all support the Spring Boot feature. It doesn’t generate any application code but provides a basic project structure. All you need to do is write the application code.
Spring Initializr enables you to select a project, the programming language of your choice, and add dependencies such as development tools, actuators, web pages, and so on. To create a project, you must just click the Generate button after selecting the options on the Spring Initializr screen.
The project includes the Gradle build specification or pom.xml, depending on which Gradle or Maven project you chose to build, respectively. In addition to that, it includes a class with a main () method that boots up the application. Spring Boot is used to auto-configure the application context and set empty properties.
Spring CLI
The Spring Boot CLI is a command line tool that you can use to create Spring applications quickly. By using Spring CLI, you can code Java-based applications by using your Java knowledge, even if you don’t write reusable code repeatedly. The starter component resolves dependencies when you start a new project.
To use the Initializr to kick-start development on a Java project on a more traditional project, you must first use this Spring Boot feature. The init command is, for instance, a way to use the Initializr to create a baseline project. The resulting zip file has the project structure, which you can then add or remove as you please. If not, you can modify the code as well.
Autoconfiguration
The autoconfiguration feature provided by Spring Boot can help you develop and integrate your code but you still need to manually configure a lot of things. Now imagine you want to create a new library that you will use at different locations in your application. You can develop and integrate the code, but you may still be required to manually configure a lot of things.
It is possible to choose dependencies for a new Spring Boot project. These dependencies, based on which the autoconfiguration feature loads specific default configurations, are evaluated by Spring Boot during application startup. The AutoConfiguration class is fortified with @Conditional annotations that activate beans in particular circumstances, and the @Conditional annotation is used to activate beans in certain circumstances.
To use Spring’s conditional annotations, we must refer to the reference documentation. If our usage scenario does not require these conditions, you may create your own custom ones.
You must use @EnableAutoConfiguration or @SpringBootApplication annotations to use autoconfiguration.
Externalized Configuration
All Spring Boot properties are read from the application properties or application YAML in Spring Boot applications. However, there may be circumstances where you wish to move your configuration from one environment to another. This is where you may need to configure these properties. You must rebuild and retest your application in all environments whenever you modify these variables. Furthermore, every time a change is made, you must also restart your application in production.
Spring Boot allows you to externalize your configuration by coding your application code as if it were used in one environment and then in another environment. You can reuse your application code in diverse environments by externalizing your configuration. You can externalize your configuration to use the code you created in one environment as a starting point. You can export your configuration as follows:
- Properties files
- YAML files
- Environment variables, etc.
You may need to understand what is happening inside an application in order to debug it or log it. For example, how many times a specific service was contacted, or how often a specific service failed. The Actuator framework is an easy-to-use framework you can use without installing another application or tool to inspect your application health-check endpoints. Spring Actuator is a lightweight means to track health, metrics, information, and so on.
You can interact with Actuator endpoints in Spring Boot, as well as those provided by Spring. Spring Boot includes a variety of built-in actuator endpoints and actuator implementations, so you can either add your own actuators or use the ones provided.
Spring Boot Architecture
Spring Boot is a specialised part of the Spring Framework. It is utilised to create high-quality, production-grade Spring Based Applications with minimal effort. Spring Framework code is used to create Spring Boot.
Spring Boot uses a hierarchical architecture in which each layer communicates with the layer immediately below or above it ( hierarchical structure).
Before getting to the Spring Boot Architecture, we must first understand what each of those layers and classes means. The four layers in Spring Boot are as follows:
- Presentation Layer
- Business Layer
- Persistence Layer
- Database Layer


The following information is provided about these layers:
Presentation Layer: A JSON structure is made up of viewpoints. A front layer is what is seen from the outside and a back layer is where the structure is built from viewpoints. It interprets JSON and handles authentication and HTTP requests. After authentication, it enters the business layer for further processing.
Business Layer: As part of business logic, it manages all of the business decisions and performs the business validation and consent. For example, only admins may modify the customer’s account.
Persistence Layer: All of the storage logic in this program, including database questions, is accounted for in this portion of code. It also translates between database rows and company items.
Database Layer: The structure is constructed in this way: The HTTP request or internet requests are handled by the Controllers from the demonstration layer, the providers control the company logic, as well as also the repositories preserve persistence (storage logic). Each provider, service, and repository may be controlled by a single Controller. There are many repositories, which may be managed by many repositories, and databases may be managed by many databases.
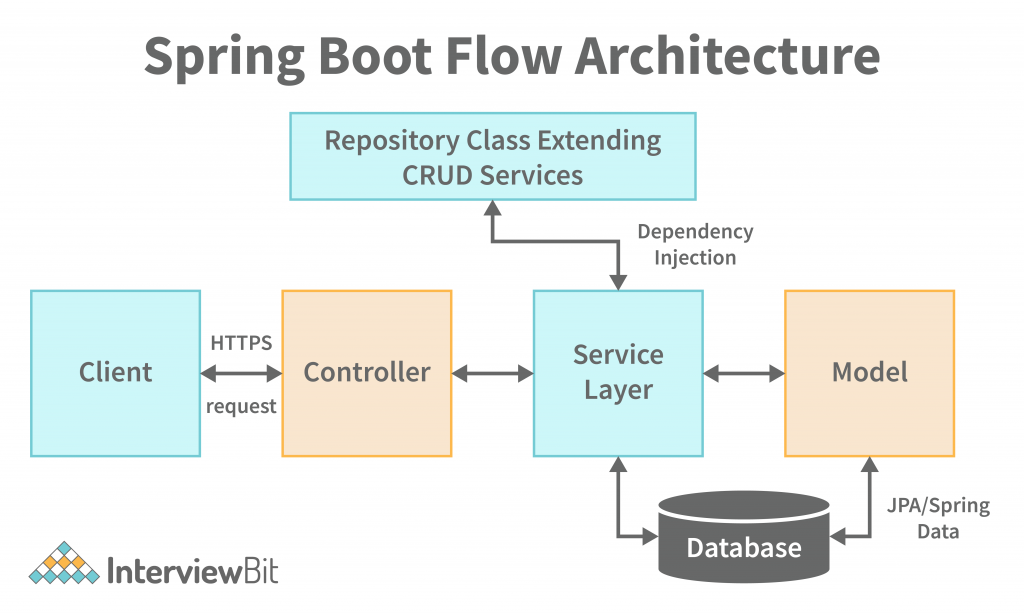
Spring Boot Workflow Architecture
Spring Boot relies heavily on the Spring framework, which means that it integrates almost all of the features and modules of Spring-like Spring MVC, Spring Core, and so on, but there is no demand for your DAO and DAOImpl classes.

Explanations:
- Validator classes, view classes, and utility classes have been defined.
- Spring Boot employs the same modules as Spring-like Spring MVC, Spring Data, and so on, but it has a different architecture. Spring Boot is the same as Spring MVC, but the one difference is that no DAO and DAOImpl classes are required.
- Temporarily blocks an operation in order to create a data access layer and perform CRUD operations.
- The client handles the HTTP requests (PUT or GET).
- The controller receives the request, and it handles it. Then, it passes the request to the service logic if necessary.
- All business logic is implemented in the service layer. It performs the logic on the data that is mapped to JPA using model classes.
- An error is not reported to the user when a JSP page is returned to the application.
Advantages and Disadvantages of Spring Boot Architecture
The following are the benefits and limitations listed:
Advantages
- Spring Boot allows for quick and easy development of spring-based applications in Java or Groovy.
- Spring Boot optimizes for reduced time. It reduces the time spent developing and increasing productivity.
- By reducing all the manual labour involved in writing annotations, boilerplate codes and XML configurations, it also helps in reducing the risk of errors.
- The Spring Boot Application with Spring Ecosystem, which includes Spring Security, Spring Data, Spring JDBC and Spring ORM, is now easy to integrate with Spring.
- It would also be easier for developers to follow the ‘Opinionated Defaults Configuration’
- Development Web apps can be tested using Embedded HTTP servers such as Jetty, Tomcat, and also conveniently rely on them.
- The Spring Boot CLI is accessible through the Command Line Interface, which has been and is being developed and tested in Spring Boot applications written in Java or Groovy.
- Spring Boot can be built with the aid of tools like Gradle and Maven, as well as the jBOSS. Alongside, it provides a lot of plugins that make effortless development and testing of Spring Boot applications possible.
- Working with embedded and memory databases is extremely convenient and easily accomplished with the plugin.
Disadvantage
- There is no problem with converting legacy or existing Spring Framework projects to Spring Boot applications, however, the time involved in the process is critical.
- The size of the application deployment file is increased because of the high number of unused dependencies caused by Spring Boot.
- Becoming a Spring Boot application requires the time-consuming and complicated process of converting a legacy Spring project to a Spring Boot one.
- Many developers argue that Spring Boot is not suitable for building large-scale applications because it is unsuitable for working with microservices.
- Spring Boot works well with small applications, as it can be deployed directly into Docker containers. In a large and complex application, I’d rather not use Spring Boot.
Conclusion
Spring Boot is a development framework that is built on top of the Spring framework. We also learnt about the different layers in the Spring Boot architecture in this article. We also learnt about the flow in Spring Boot Architecture.